ติดตั้งและทดสอบ Mosquitto MQTT Broker
MQTT ย่อมาจาก Message Queuing Telemetry Transport เป็นโปรโตคอล machine-to-machine (M2M) ใช้ในงาน IOT (Internet of Things) ออกแบบมาให้มีขนาด package ที่มีขนาดเล็กมาก ให้ทําการ publish (ส่งข้อมูล) และ Subscribe (ติดตามข้อมูล) ไป ยังตัว Server ที่เรียกกันว่า MQTT Broker ซึ่งตัว Server จะทําหน้าที่จัดคิว ของข้อมูลต่างๆ ให้มีประสิทธิภาพสูงสุด
ทำการติดตั้งMQTTLensโดยเข้าไปที่ https://chrome.google.com/webstore/search/mqttlens

step2: เปิดหน้าเเอพ ไปที่ chrome://apps

step3: Add connection เสร็จแล้วแล้วกด create connection

จะได้

Subscribe คือการที่เรา สร้าง channel
Publish คือเราจะส่งข้อความไปใน channel

1.2 ทดสอบ “iot eclips broker” ด้วย ESP8266

เปิด Arduino IDE เเล้ว ใช้ code ตามนี้เลย
สิ่งที่ต้องใส่เป็นของเราคือ name wifi ,password wifi เเละ topicl คือ topicl ที่สร้างใน MQTT Lens
CODE
#include <ESP8266WiFi.h>
#include <PubSubClient.h>
const char* ssid = "name_wifi";
const char* password = "password_wifi";
const char* mqtt_server = "iot.eclipse.org";
//IPAddress My_mqtt_server(192, 168, 43, 26);
const char* UName = "";
const char* PassW = "";
const char* topic1 = "test";
int TestLED = D4;
WiFiClient espClient;
PubSubClient client(espClient);
long lastMsg = 0;
char msg[50];
int value = 0;
void setup_wifi() {
delay(10);
Serial.println();
Serial.print("Connecting to ");
Serial.println(ssid);
WiFi.begin(ssid, password);
while (WiFi.status() != WL_CONNECTED) {
delay(500);
Serial.print(".");
}
randomSeed(micros());
Serial.println("");
Serial.println("WiFi connected");
Serial.println("IP address: ");
Serial.println(WiFi.localIP());
pinMode(TestLED, OUTPUT);
}
void callback(char* topic, byte* payload, unsigned int length)
{ Serial.print("Message arrived [");
Serial.print(topic1);
Serial.print("] ");
for (int i = 0; i < length; i++)
{ Serial.print((char)payload[i]);
}
Serial.println();
Serial.print(" ---> ");
Serial.println((char)payload[0]);
if ((char)payload[0] == 'o') digitalWrite(TestLED, HIGH);
if ((char)payload[0] == 'f') digitalWrite(TestLED, LOW);
}
void reconnect()
{ while (!client.connected()) // Loop until we're reconnected
{ Serial.print("Attempting MQTT connection...");
String clientId = "ESP8266Client-";
clientId += String(random(0xffff), HEX); // Create a random client ID
if (client.connect(clientId.c_str(), UName, PassW)) // Attempt to connect
{ Serial.println("connected"); // Once connected, publish an announcement...
client.publish(topic1, "Hello World Pk007"); // ... and resubscribe
client.subscribe(topic1);
} else
{ Serial.print("failed, rc=");
Serial.print(client.state());
Serial.println(" try again in 5 seconds");
delay(5000);
}
}
}
void setup(){
Serial.begin(115200);
setup_wifi();
client.setServer(mqtt_server, 1883);
client.setCallback(callback);
pinMode(TestLED, OUTPUT);
}
void loop(){
if (!client.connected()) reconnect()
client.loop();
long now = millis();
if (now - lastMsg > 2000)
{ lastMsg = now;
++value;
snprintf (msg, 75, "hello world #%ld", value);
Serial.print("Publish message: ");
Serial.println(msg);
client.publish(topic1, msg);
}
}
1.3 ติดตั้ง “mosquito broker”
โดยใช่ raspberry pi เป็น Broker
step1: Update/ Upgrade Raspbian และ เริ่มบูทเครื่องใหม่ พิมพ์ code
$ sudo apt-get update
$ sudo apt-get upgrade
$ Sudo reboot
step2:ติดตั้งโปรแกรม Mosquitto (MQTT Server), และ MQTT Clients
2.1 SSH into Raspberry Pi and create a new directory for temp files –
mkdir mosquitto
cd mosquitto
2.2. Import the repository package signing key –
wget http://repo.mosquitto.org/debian/mosquitto-repo.gpg.key
sudo apt-key add mosquitto-repo.gpg.key
2.3. Make the repository available to apt –
cd /etc/apt/sources.list.d/
sudo wget http://repo.mosquitto.org/debian/mosquitto-stretch.list
sudo apt-get update
sudo apt-cache search mosquitto
2.4. Install Mosquitto MQTT Broker and MQTT Clients –
sudo apt-get install mosquitto
sudo apt-get install mosquitto-clients
2.5. Check Mosquitto Service Status, Process and Default Port (1883) –
service mosquitto status
ps -ef | grep mosq
netstat -tln | grep 1883

step3:แก้ไขไฟล์คอนฟิกเกอเรชั่น โดยเพิ่มบรรทัดใหม่ 3 บรรทัดที่ด้านล่างสุดของไฟล์ แล้วบันทึกการเปลี่ยนแปลงในไฟล์ โดยกดปุ่ม Ctrl+O เมื่อปรากฏชื่อไฟล์ ให้กด
ปุ่ม Enter เพื่อยอมรับ แล้วออกจากเทกซ์อิดิทเตอร์ โดยกดปุ่ม Ctrl+X
sudo nano /etc/mosquitto/mosquitto.conf
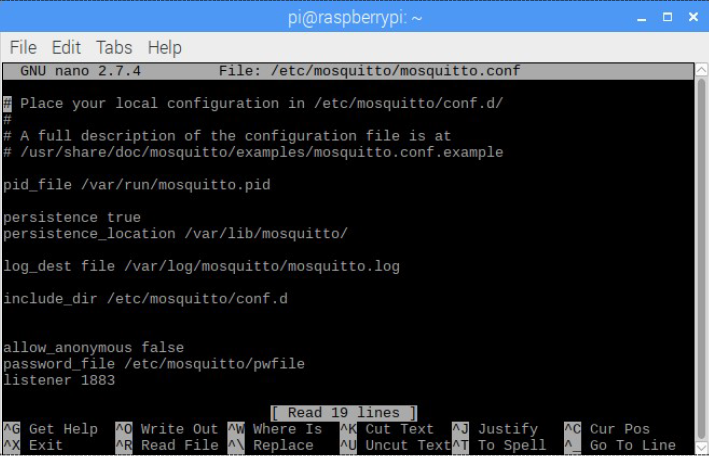
ใส่codeลงไป
allow_anonymous false
password_file /etc/mosquitto/pwfile
listener 1883
step4:สร้างยูสเซอร์ชื่อ mymqtt และกำหนดพาสเวิร์ดเป็น myraspi หรือพาสเวิร์ดอื่นๆ เก็บไว้ใน pwfile โดยป้อนคำสั่ง
sudo mosquitto_passwd -c /etc/mosquitto/pwfile mymqtt
Password: ป้อนพาสเวิร์ด myraspi
Reenter password: ป้อนพาสเวิร์ดยืนยัน myraspi
step5:เราได้ติดตั้ง Mosquitto เสร็จเรียบร้อยแล้ว แต่จะต้องบูทเครื่องใหม่ เพื่อให้Mosquitto เริ่มทำงาน
sudo reboot
step6:เริ่มทดสอบการทำงานของ MQTT Server หรือ Mosquitto โดยเราจะทดสอบด้วยการเรียกหน้าต่าง PuTTY ออกมา 2 หน้าต่าง เพื่อจำลองว่าเรามีอุปกรณ์ 2 ชิ้น ซึ่ง
หน้าต่างหนึ่งจะทำหน้าที่เป็นซับสไครบ์เบอร์หรือตัวรับข้อมูล (Subscriber) อีก
หน้าต่างหนึ่งจะทำหน้าที่เป็นพับบลิเชอร์หรือตัวส่งข้อมูล (Publisher) เริ่มเรียก
โปรแกรม PuTTY แล้ว Connect ใหม่ โดยใช้หมายเลข IP Address เดิม
6.1การรับข้อมูล (Subscriber) ป้อนซับสไครบ์ Topic ชื่อ mynew/test
mosquitto_sub -d -u mymqtt -P myraspi -t mynew/test
6.2การส่งข้อมูล (Publisher) ป้อนพับข้อมูล "ทดสอบ" ในTopic ชื่อ mynew/test
mosquitto_pub -d -u mymqtt -P myraspi -t mynew/test -m"Test1234"
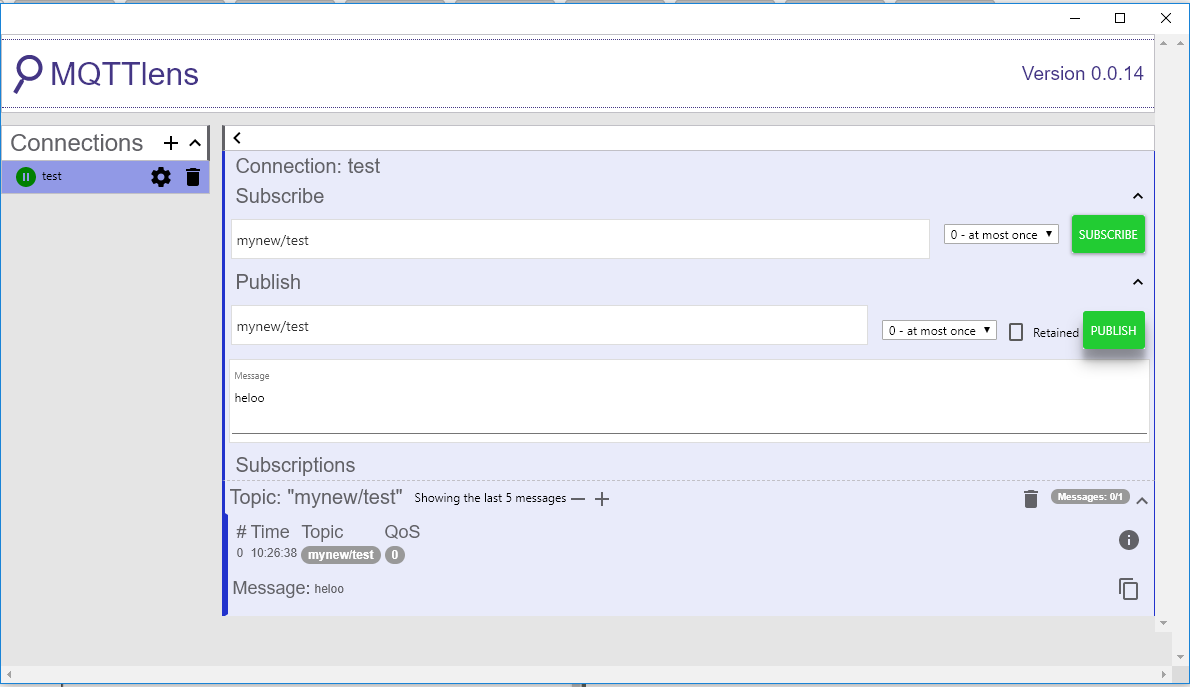
1.4 ทดสอบ “mosquito broker” ด้วย MQTT Lens
step1: ใส่connection name
step2: RPi IP,Port = 1883
step3: username : mymqtt
password: myraspi

ทดสอบ

1.5 ทดสอบ “mosquito broker” ด้วย ESP8266
step1: upload code ของ esp ใหม่เปิด Arduino IDE เเล้ว ใช้ code ตามนี้เลย สิ่งที่ต้องใส่เป็นของเราคือ namewifi ,password wifi เเละ topicl คือ topicl เป็น mynew/test
UName : mymqtt PassW : myraspi
My_mqtt_server : เป็น ip ของ wifi ที่ pi ต่อ check ด้วยคำสั่ง
ifconfig

CODE:
#include <ESP8266WiFi.h>
#include <PubSubClient.h>
const char* ssid = "name_wifi";
const char* password = "password_wifi";
//const char* mqtt_server = "iot.eclipse.org";
IPAddress My_mqtt_server(172, 20, 10, 3);
const char* PassW = "myraspi";
const char* UName = "mymqtt";
const char* topic1 = "mynew/test";
int TestLED = D4;
WiFiClient espClient;
PubSubClient client(espClient);
long lastMsg = 0;
char msg[50];
int value = 0;
void setup_wifi() {
  delay(10);
  Serial.print("Connecting to ");
  Serial.println();
  WiFi.begin(ssid, password);
  Serial.println(ssid);
    delay(500);
  while (WiFi.status() != WL_CONNECTED) {
    Serial.print(".");
  }
randomSeed(micros());
  Serial.println("");
  Serial.println("WiFi connected");
  Serial.println("IP address: ");
  pinMode(TestLED, OUTPUT);
  Serial.println(WiFi.localIP());
}
void callback(char* topic, byte* payload, unsigned int length)
{ Serial.print("Message arrived [");
  Serial.print(topic1);
  { Serial.print((char)payload[i]);
  Serial.print("] ");
  for (int i = 0; i < length; i++)
  }
  Serial.println();
  if ((char)payload[0] == 'o') digitalWrite(TestLED, HIGH);
  Serial.print(" ---> ");
  Serial.println((char)payload[0]);
}
  if ((char)payload[0] == 'f') digitalWrite(TestLED, LOW);
void reconnect()
{ while (!client.connected()) // Loop until we're reconnected
  { Serial.print("Attempting MQTT connection...");
    clientId += String(random(0xffff), HEX); // Create a random client ID
    String clientId = "ESP8266Client-";
    { Serial.println("connected"); // Once connected, publish an announcement...
    if (client.connect(clientId.c_str(), UName, PassW)) // Attempt to connect
    { Serial.print("failed, rc=");
      client.publish(topic1, "Hello World Pk007"); // ... and resubscribe
      client.subscribe(topic1);
    } else
}
      Serial.print(client.state());
      Serial.println(" try again in 5 seconds");
      delay(5000);
    }
  }
void setup()
{ Serial.begin(115200);
  setup_wifi();
  client.setServer(My_mqtt_server, 1883);
  client.setCallback(callback);
}
  pinMode(TestLED, OUTPUT);
void loop()
{ if (!client.connected()) reconnect();
  client.loop();
  long now = millis();
  { lastMsg = now;
  if (now - lastMsg > 2000)
    ++value;
    Serial.print("Publish message: ");
    snprintf (msg, 75, "hello world #%ld", value);
    Serial.println(msg);}
    client.publish(topic1, msg);
  }


ไม่มีความคิดเห็น:
แสดงความคิดเห็น